Glitter and Dirt Mom Life Be Like: A Designer’s Review
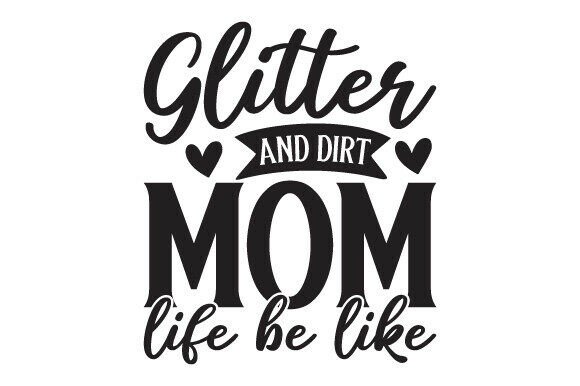
When I first opened the download for Glitter and Dirt Mom Life Be Like, I immediately thought of the mom I made a custom tote bag for last month. She’s the one who shows up to school pickup with a little sparkle on her eyelid and a suspicious smear of playground dirt on her jeans. This design captures that exact messy, magical duality. It’s not just a phrase—it’s a badge of honor. The mood is playful, honest, and just the right amount of sassy. As a graphic, it’s bold enough to read across a room, and the layout feels balanced enough for a wide range of embroidery projects.
Now, a quick reality check: this is a graphics file, not a pre-digitized embroidery file. The download is a zipped folder containing SVG, DXF, PNG, EPS, and JPG formats, all isolated on white and black backgrounds. That’s a huge plus for anyone who plans to digitize this for machine embroidery, because you can see exactly how the design will behave on light or dark fabrics before you ever thread a needle. But it also means you’ll need to convert it yourself—or hire a digitizer—before it can become a stitch file. For embroidery designers, small business owners, and crafters who are comfortable with that step, the real value lies in how well the design translates to thread and fabric.
First Impressions: A Design That Speaks to Real Moms
The moment I saw the lettering, I knew it would resonate with buyers. The phrase “Glitter and Dirt Mom Life Be Like” hits that sweet spot between cheeky and heartfelt. It’s the kind of statement that makes a mom stop scrolling and say, “That’s me.” From a design perspective, the typography has a nice mix of styles—some characters feel a little elegant, others a bit gritty. When I imagine this stitched out, I can already see a metallic thread shimmering on the “Glitter” part and a matte, dense fill on “Dirt” to give it some texture. That contrast is what makes the design memorable.
The isolated white and black backgrounds in the file set are a small detail that makes a world of difference. I don’t have to waste time cleaning up a messy background to use the PNG or JPG for mockups. I can drop the design onto a product photo, share it with a client, and get instant approval. For embroidery digitizing, the vector files (SVG, DXF, EPS) are the real stars. They scale perfectly, so I can enlarge the design for a jacket back or shrink it for a baby onesie without losing a single node.
From Vector File to Embroidery Thread
I always test a new design like this on scrap fabric before I commit to a customer order. The first thing I check is how the tiny details will hold up. The “glitter” part typically includes small sparkle shapes, and in embroidery, anything smaller than a millimeter can become a muddy blob. I’d simplify a few of those sparkles, maybe replace a cluster of five tiny stars with three slightly larger ones. The lettering needs careful kerning, too. A satin stitch on a stretchy fabric can pull letters together, so I’d add a little extra space between characters and use a fusible mesh stabilizer.
One thing I appreciate about this design is that the layout isn’t overly long. It fits comfortably in a 5x7 hoop, and even a 4x4 hoop can work if you scale it down slightly—just watch the smallest details. I’d digitize the “Glitter” portion with a smooth satin stitch and the “Dirt” section with a textured fill stitch to give it a tactile, gritty feel. The contrast between the two concepts shouldn’t be just visual; it should be something you can feel when you run your hand over the finished embroidery. That’s the kind of detail that makes a product feel premium.
Real Project Scenario: A Tote Bag That Tells a Story
Let me walk you through a real project I’m working on. A client ordered a custom canvas tote bag for her sister’s birthday. She wanted something that was equal parts funny and wearable. I opened the Glitter and Dirt Mom Life Be Like SVG in my digitizing software, set up a 5x7 hoop, and started planning the stitch flow. I chose a sturdy natural cotton canvas, which holds embroidery beautifully without puckering. I used a cutaway stabilizer, and I split the design into a few color stops: a bright gold metallic thread for the “glitter” accents, a dark brown for the “dirt” word, and a soft charcoal for the main lettering.
The mockup was a breeze. I used the PNG file isolated on the black background to show the client how the design would look on a dark navy tote. She loved it instantly. That kind of quick turnaround builds trust, and it’s possible because the file is already clean and ready to use. After stitching, the design looked crisp and professional. The metallic thread caught the light just enough to hint at sparkle without being overbearing. The “dirt” felt almost like a printed graphic, but with the depth only embroidery can give. It’s the kind of product that would sell itself at a craft fair.
What the File Formats Actually Do for You
I’ve seen plenty of digital files that come with a single PNG and a blurry JPG. This one is generous. The SVG and DXF are vector formats, which means you can scale the design to any size without losing quality. That’s essential for embroidery digitizing, because you need a clean outline to assign stitch types. The EPS is another vector option, great if you’re working in professional design software. The PNG and JPG are raster files, but they’re isolated on white and black, so they’re perfect for product mockups, sublimation, or even vinyl cutting. For embroidery, though, the vector files are the ones you’ll use most.
The zipped folder keeps everything tidy. I’d recommend keeping a backup of the original zip, just in case. The filenames are clear, and there’s no hunting through cryptic labels. That’s a small but important detail that tells me the creator understands the workflow of a busy maker.
Where This Design Shines in a Craft Business
If I were building a small product line, I’d put this design on unisex crewneck sweatshirts, canvas tote bags, and maybe a set of kitchen towels. The message is relatable, so it sells well in Etsy shops and at local markets. Moms love a little humor and honesty, and a crisp, well-stitched version of this phrase can turn a basic item into a thoughtful gift. I’ve seen similar mom-themed designs perform incredibly well during Mother’s Day and the holiday season. For baby items, a scaled-down version on a bib or a soft cotton blanket would be adorable—just make sure the fabric is stable enough for the stitch density.
One thing I’d caution: avoid extremely textured fabrics like terry cloth or heavily napped fleece. The fine details of the “glitter” can get swallowed up. On thin, stretchy fabric, a dense satin stitch can pucker. I’d use a water-soluble topper for a clean surface, and I’d always test a sample first. Caps and hats are tricky because of the curved surface; I’d digitize a separate version with a slight arc to match the curve, or stick to flat areas like the front panel of a structured hat.
Practical Tips for Stitching Success
Here are the notes I’d share with any designer or maker who wants to use this design in embroidery:
- Test on scrap fabric first. Use a piece that matches your final product’s texture and stretch. Don’t skip this.
- Check thread color contrast. The isolated black and white backgrounds in the download help you see how the design will read on light or dark garments, but your actual thread colors can shift the mood. Metallic gold on navy is stunning; matte black on a charcoal sweatshirt can get lost.
- Review stitch density. Too many stitches can make the fabric stiff and prone to cracking, especially on a tote bag that gets heavy use. A medium-density satin with a light underlay usually works best.
- Confirm your hoop size. For a 4x4 hoop, scale the design down, but check that the smallest glitter dots and the lettering remain legible. If the design gets too small, simplify the details.
- Use proper stabilizer. Cutaway for stable woven fabrics, tear-away for lighter designs, and fusible mesh for stretchy knits. A topper helps with plush textures.
- Inspect the small details. Open the SVG in a vector editor and look at the sparkle shapes. If any are narrower than 0.8mm, they’ll likely disappear in stitches. Merge or enlarge them as needed.
- Check the licensing terms. Even though this is a graphics file, you want to make sure you’re allowed to use it on items you sell. Many crafters assume all SVG files come with full commercial rights, but that’s not always the case. Look for a license file inside the zipped folder, or contact the creator if you’re unsure.
The Commercial Angle: Selling Finished Products
For commercial embroidery, the flexibility of this file is a real advantage. You can digitize it once and export to PES, DST, EXP, or whatever format your machine needs. The vector files let you create multiple sizes without quality loss, so you can offer the design on everything from a baby onesie to a large tote bag. The PNG and JPG with isolated backgrounds are perfect for product listings. A clean, relatable mockup increases buyer trust and engagement. I’ve found that lifestyle photos with a smiling mom holding the finished product sell even better than flat-lay shots, and this design’s honest message makes it easy to build that emotional connection.
If you’re an Etsy seller or a small shop owner, consider bundling this design with a matching mom-and-child set. The “Glitter and Dirt” theme naturally extends to sibling items. A set of matching aprons for a mom and daughter, for example, would be a hit around Mother’s Day. Just make sure you’re comfortable with the digitizing process, or partner with a professional digitizer who can translate the vector file into a stitch-ready format while preserving the design’s personality.
The Little Details That Make a Big Difference
One thing that often gets overlooked is how the design will look after repeated washing. I’d recommend using a high-quality polyester thread for the “Glitter” satin stitches, because it holds up better than rayon and won’t fade as quickly. The “Dirt” fill can be a bit denser, but I’d still avoid piling on too many stitches. A stiff, heavy embroidery patch can feel uncomfortable on a garment and may crack over time. I’d also add a light zigzag underlay to keep the edges smooth and prevent the fabric from showing through the stitches.
The isolated white and black backgrounds aren’t just for mockups. I can use the black-background PNG to test how the design will look on a dark hoodie, and the white-background version for a light tea towel. That visual check helps me avoid color clashing and ensures the message pops. It’s a time-saver I’ve come to appreciate.
Final Thoughts for Designers and Makers
Glitter and Dirt Mom Life Be Like is a solid, well-prepared graphic file that’s ready to slide into a maker’s workflow. It’s not a turnkey embroidery file, but for anyone comfortable with digitizing, the design offers a lot of potential. The mix of vector and raster formats, the clean isolation, and the relatable theme make it a strong candidate for custom apparel, personalized gifts, and small business merchandise. I’d recommend it to embroidery designers, Etsy sellers, and craft entrepreneurs who want to add a piece that speaks directly to the mom market. Just remember to test, test, test—and always check your licensing before you sell. With a little care, this design can become a beloved, repeatable product in your line.